
Configuring and running the deployment#
A complete Freva instance will need the following services:
freva-rest api
mongoDB server
MySQL server
Redis server (optional)
Data-loader server(s) (optional)
Web ui app (optional)
Nginx reverse proxy for connecting to the web ui app (optional)
Freva client - core - library
Tip
Please consult the Frequently Asked Questions guide to see how you can fix known issues.
Container or Conda-Forge Deployment#
Starting with version 2505.0.0 of the deployment software, you can choose
how the services are deployed. Two options are supported:
Container-based deployment using Docker or Podman
Conda-Forge-based deployment using open-source packages
Unlike Anaconda, the conda-forge channel provides fully open-source packages, avoiding potential licensing conflicts.
Danger
Versions prior to 2505.0.0 supported only Docker/Podman container deployments.
If you’re upgrading from a version older than 2505.0.0 and wish to switch
to a Conda-based setup, you must first run the deployment software once using
the deployment_method=podman (or docker) option. This ensures that all
persistent service data is migrated before switching to the Conda environment.
Inspecting and adjusting the config#
With help of the deploy-freva config you can inspect and adjust configuration
values.
deploy-freva config --help
Usage: deploy-freva config [-h] [-v] [-V] {get,set} ...

Positional Arguments:
  {get,set}
    get          Use this command to query either the whole or parts of the
                 deployment config.
    set          Use this command to set/override values of the deployment
                 config.

Options:
  -h, --help     show this help message and exit
  -v, --verbose  Verbosity level (default: 0)
  -V, --version  show program's version number and exit
If you want to set config that aren’t simply string, bool, int or float you must follow toml syntax
Tip
To create a new config from the config template you can use the
deploy-freva config get -r command and pipe the output into a file:
deploy-freva config get -r > my-new-config.toml
Creating a Compose file ready to go#
If you are fine with setting up all services on one machine and using docker-compose or podman-compose you can create a complete compose file that contains all the services with help of the compose sub command:
deploy-freva compose --help
Usage: deploy-freva compose [-h] [-v] [-V] [-c CONFIG_FILE] [--host HOST]
                            [--no-web] [-u USER]
                            [--dns-nameservers DNS_NAMESERVERS [DNS_NAMESERVERS ...]]
                            [--no-plugins] [--secrets-file SECRETS_FILE]
                            [-e {docker,podman}] [-s]

Options:
  -h, --help            show this help message and exit
  -v, --verbose         Verbosity level (default: 0)
  -V, --version         show program's version number and exit
  -c, --config-file CONFIG_FILE
                        Path to ansible inventory file. (default:
                        /home/runner/.config/freva/deployment/config/inventory
                        .toml)
  --host HOST           Host name where the compose service should be running.
                        (default: None)
  --no-web              Do not deploy the web service. (default: False)
  -u, --user USER       User name that should run the services inside the
                        container. (default: root)
  --dns-nameservers DNS_NAMESERVERS [DNS_NAMESERVERS ...]
                        Set dns nameserver entries for the nginx reverse proxy
                        (default: ['127.0.0.53'])
  --no-plugins          Do not setup core library to use plugins. (default:
                        False)
  --secrets-file, --secrets_file, --secrets SECRETS_FILE
                        Set a secrets file to read sensitive variables from.
                        (default: None)
  -e, --container-engine {docker,podman}
                        Create a compose file for docker or podman. (default:
                        docker)
  -s, --systemd-service
                        Create a systemd-service file. (default: False)
You can edit and copy the resulting compose file and systemd service unit to the target machine, and start it. This will bring up all micro services necessary to start the freva components.
Note
The compose sub command will not log on to any remote machines nor
set up anything else than a docker compose file and if chosen, a systemd
unit file to start the compose service. If you want to use freva core
library with data analysis plugins you will have to install freva
from conda-forge.
Once you have installed the core library you will have to adjust the volumes
and EVALUATION_SYSTEM_CONFIG_FILE environment variable in the web-app
section of your compose file.
Kubernetes based deployment#
Since v2511.0.0 the deploy-freva software supports kubernetes (k8s)
based deployments. To configure the k8s setup use the [kubernetes] section
in the config toml file. Generating manifests that can be applied via
kubectl is done by the kubernetes
sub-command:
deploy-freva kubernetes --help
Usage: deploy-freva kubernetes [-h] [-v] [-V] [-c CONFIG_FILE]
                               [-s {web,db,freva-rest,data-loader} [{web,db,freva-rest,data-loader} ...]]
                               [--secrets-file SECRETS_FILE] [-e EXTRA EXTRA]
                               [--secrets] [-o OUTPUT] [--no-plugins]

Options:
  -h, --help            show this help message and exit
  -v, --verbose         Verbosity level (default: 0)
  -V, --version         show program's version number and exit
  -c, --config-file CONFIG_FILE
                        Path to ansible inventory file. (default:
                        /home/runner/.config/freva/deployment/config/inventory
                        .toml)
  -s, --services {web,db,freva-rest,data-loader} [{web,db,freva-rest,data-loader} ...]
                        The services to be deployed. (default: ['db',
                        'freva-rest', 'web', 'data-loader'])
  --secrets-file, --secrets_file SECRETS_FILE
                        Set a secrets file to read sensitive variables from.
                        (default: None)
  -e, --extra EXTRA EXTRA
                        Add/Override inventory settings. (default: None)
  --secrets, --with-secrets
                        Create the secrets manifest. You only have to render
                        the secrets manifest once. Use the flag to include
                        rendering of the secrets manifest. (default: False)
  -o, --output OUTPUT   Output directory where the manifests should be
                        located. (default: None)
  --no-plugins          Do not setup core library to use plugins. (default:
                        False)
Running the deployment#
The command deploy-freva opens a text user interface (tui) that will walk
you through the setup of the deployment.
Tip
Navigation is similar to the one of the nano text editor.
The shortcuts start with a ^ which indicates CTRL+.
Please refer to the usage of the text user interface section on tui usage instructions.
Deployment with existing configuration.#
Although we recommend you to follow the deployment tui you can also directly use toml configuration files for setting up the deployment. Two examples of such deployment configurations can be found in the example deployment configuration section.
If you already have a configuration saved in a toml configuration file you can
issue the deploy-freva cmd command:
deploy-freva cmd --help
Usage: deploy-freva cmd [-h] [--config CONFIG]
                        [--steps {web,core,db,freva-rest,auto} [{web,core,db,freva-rest,auto} ...]]
                        [--ask-pass] [--ssh-port SSH_PORT] [-v] [-l] [--debug]
                        [-g] [--skip-version-check] [-V]
                        [-t {core,db,cache,data-loader,freva-rest,mongodb,search-server,pre-web,web} [{core,db,cache,data-loader,freva-rest,mongodb,search-server,pre-web,web} ...]]
                        [--secrets-file SECRETS_FILE] [-e EXTRA EXTRA]
                        [--inspect] [--cowsay]

Run deployment in batch mode.

Options:
  -h, --help            show this help message and exit
  --config, -c CONFIG   Path to ansible inventory file. (default:
                        /home/runner/.config/freva/deployment/config/inventory
                        .toml)
  --steps, -s {web,core,db,freva-rest,auto} [{web,core,db,freva-rest,auto} ...]
                        The services/code stack to be deployed. Use auto to
                        only deploy outdated services (default: ['db',
                        'freva-rest', 'web', 'core'])
  --ask-pass            Connect to server via ssh passwd instead of public
                        key. (default: False)
  --ssh-port SSH_PORT   Set the ssh port, in 99.9% of the cases this should be
                        22 (default: 22)
  -v, --verbose         Verbosity level (default: 0)
  -l, --local           Deploy services on the local machine. (default: False)
  --debug               Deploy services on the local machine. (default: False)
  -g, --gen-keys        Generate public and private web certs, use with
                        caution. (default: False)
  --skip-version-check  Skip the version check. Use with caution. (default:
                        False)
  -V, --version         show program's version number and exit
  -t, --tags {core,db,cache,data-loader,freva-rest,mongodb,search-server,pre-web,web} [{core,db,cache,data-loader,freva-rest,mongodb,search-server,pre-web,web} ...]
                        Fine grain deployment. Instead of using steps you can
                        set those ansible tasks (tags) to be deployed.
                        (default: None)
  --secrets-file, --secrets_file SECRETS_FILE
                        Set a secrets file to read sensitive variables from.
                        (default: None)
  -e, --extra EXTRA EXTRA
                        Add/Override inventory settings. (default: None)
  --inspect, -i         Inspect all config values and exit. (default: False)
  --cowsay              Let the cow speak! (default: False)
The --steps flags can be used if not all services should be deployed.
Keeping secrets out of version control#
Some configuration variables are sensitive and must not be shared publicly. OpenID Connect credentials are a typical example
client IDs, client secrets, and token endpoints should never end up in a public repository.
Starting with version 2506.2.0, you can split your configuration across
two files: a main configuration file that is safe to commit, and a separate
secrets file that you keep out of version control entirely.
Pass the secrets file via the --secrets-file flag:
--secrets-file secrets.toml
The secrets file follows the same structure as the main configuration file. Any values it defines override those in the main file, so you only need to include the keys you want to keep private.
Setting the python environment#
Some systems do not have access to python3.4+ (/usr/bin/python3) or git by default.
In such cases you can overwrite the ansible_python_interpreter in the inventory
settings of the server section to point ansible to a custom python3 binary. For example
ansible_python_interpreter=/sw/spack-rhel6/miniforge3-4.9.2-3-Linux-x86_64-pwdbqi/bin/python3
Setting up the deployment without root-privileges#
Sometimes it can be necessary, either due to security concerns or user rights
restrictions, to set up all services as a un-privileged user. Since version
v2402.0.0 the deployment routine supports such setup scenarios.
Especially when security is a concern we recommend you to use the conda based
deployment instead of podman or docker for setting up the freva
infrastructure.
Root less installation works essentially just like root based installation. You
only have to either set the become_user configuration to a user name that is
different from root or leave it blank. In case you leave it blank the login
user will deploy the services. For rootless deployments we always recommend to
use a conda based service setup.
Although root-less installation is straight forward it comes with two caveats that should be kept in mind:
User based systemd services: The systemd units are not installed system wide but
on user basis, which means that you can access the service using the --user
flag: for example:
systemctl status --user freva-web
instead of
systemctl status freva-web
This also means that in its default configuration systemd will terminate all running user services as soon as the user terminates a login session. To avoid this you have to enable ‘lingering’ states of services for that user:
loginctl enable-linger <USER>
This command can only by applied by the root user. Backups are also done as
user instead of system wide basis, you can check the backups after deployment using
the crontab -l command.
No direct access to ports 80 and 443: The freva web user interface cannot directly be accessed by a web server listing on port 80 and 443 as those ports are off limits for normal users. If you choose to deploy the web app as an unprivileged user the apache httpd web server serving the web app will be running on port 9080 instead of 80 and port 9443 instead of 443. You can either communicate the usage of those ports to the users of the system, or recommended, set up a simple redirect on another httpd server that is running on the server where the web app is deployed. Although this httpd server needs a privileged user it only has to be configured once. A simple configuration for apache httpd looks the following:
<VirtualHost *:80>
    ServerName my-host
     Redirect permanent / https://www.my-host.org.au:9443
</VirtualHost>

<VirtualHost *:443>
    ServerName my-host
     Redirect permanent / https://www.my-host.org.au:9443
</VirtualHost>
This would redirect all traffic from http(s)://www.my-host.org to the apache httpd container that serves the web app without having the users to remember the specific ports. Similar configurations are available to other web server software.
Version checking#
Because the system consists of multiple micro services the software will perform a version check before the deployment to ensure that all versions fit together. If you for example want to deploy the rest api the system will also check an update of the freva cli if it finds that the cli library doesn’t fit with the latest version of the rest api. This ensures that all parts of the system will work together.
Tip
You can disable this version checking by using the
--skip-version-check flag. Use this flag with caution.
Using environment variables#
Once the deployment configuration is set up it might be useful to store the
config and all the files that are needed to run the deployment at a central,
yet secure location. This can be useful if multiple admins will have to take
turns in (re)-deploying the system and thus the configuration has to be up to
date for those admins. The problem that arises is that the setup might differ
slightly for each person and computer running the deployment. For instance the
ansible_user key might differ. For this purpose the deployment supports setting
environment variables. Those environment variables can be used in the configuration
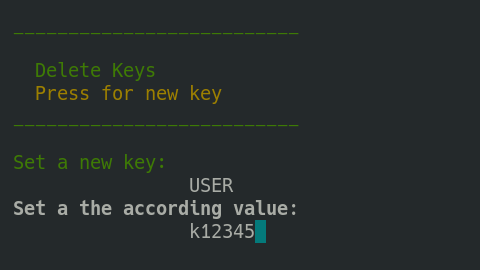
file. Like ansible_user = $USER. You can then set up the USER variable with
help of the deployment tui. To do so open the main menu (CTRL+x) and then
choose the add set variables options (CTRL+v). You can then add or edit
variables. In the figure below the USER variable is set to a specific user
name. If the deployment encounters an entry using $USER variable it will be
replaced by the according value that points to the $USER variable.
Relative paths using the $CFD variable#
Instead of setting the absolute paths in the configuration files
for example the path to the public certificate files, you should give the
paths relative to the configuration file. To indicate that the
freva-deployment machinery should create paths relative to the configuration
you should set all paths starting with the $CFD (current file directory)
variable. For example if the configuration file is located in
/home/user/config/foo/foo.toml and the public cert file is located in the
same directory as the configuration file then you can set the path to the cert
file in the configuration files via $CFD/foo.crt.
This will assure that paths will work from any other machine.
Stuck in load/save dialogue in the tui?#
The load/save forms can be exited by pressing the <TAB> key
which will get you to input field at the bottom of the screen. If the input
field has text delete it an press the <ESC> key, this will bring you get to
the screen where you started.